故事背景
周末发现在墨西哥动态 IP 家宽上新 双 11 超低折扣/机器免费送里面抽中了家宽。然后我就注册了账号,发送了邮箱给佬友,领取了墨西哥的家宽,然后开始自己搭建节点。
家宽的配置如下:
ACA Residential NAT (墨西哥家宽) - Small $2.99 → $1.79 / Month
1 CPU vCore (Low Priority)
256 MB DDR4 RAM
2 GB NVME SSD
1024 GB Two-way Traffic
100Mbps Shared Bandwidth
20 * IPv4 Port
这是NAT主机,我大致想到了要折腾哪些东西,然后记录文档,以便以后再弄不用重新研究一遍。
- 配置系统
- 绑定域名
- 端口映射
- 搭建节点
- 客户端实测
配置系统
安装系统的过程不再描述,我是选的debian 12,主机名我是随机的,我上传了电脑上的ssh key,看了一下公网ip,然后从电脑上ssh上去我配置系统。

直接用ip给ssh上去
ssh -p 50014 [email protected]
或是修改config
# windows上C:\Users\Administrator(自己的用户名)\.ssh\config的配置
Host ohno
	# NAT机的公网ip
	HostName 201.xxx.xxx.x07
	# 也可以填域名
    #HostName ohno.xxxxxx.xxx
    # 账户
    User root
    # NAT机的ssh默认端口22映射的公网端口
    Port 50014
    # ssh私钥的路径(标准路径可以省略)
    IdentityFile E:\dajon\.ssh\id_rsa
然后windows上打开终端,ssh到NAT机上

我现在已经习惯上用windows终端来ssh设备,把
C:\Users\Administrator\.ssh\config配置好,下次ssh名字就好
配置时区
时区我开始选的香港,后来直觉告诉我可能有其他坑,所以决定改成墨西哥
timedatectl list-timezones

# 下滑看到墨西哥有这些选项
Mexico/BajaNorte
Mexico/BajaSur
Mexico/General

# 选了General(为啥选他?我只认识这个单词)
timedatectl set-timezone Mexico/General
# 查看一下
root@high-glove:~# timedatectl
               Local time: Sun 2025-11-16 19:01:12 CST
           Universal time: Mon 2025-11-17 01:01:12 UTC
                 RTC time: Mon 2025-11-17 01:01:12
                Time zone: Mexico/General (CST, -0600)
System clock synchronized: no
              NTP service: n/a
          RTC in local TZ: no
其他配置
没去配置其他的,毕竟透到公网的就那么几个端口(如果局域网内其他NAT搞事情那就另外说了)。
绑定域名
我准备弄个子域名指向这个ip。

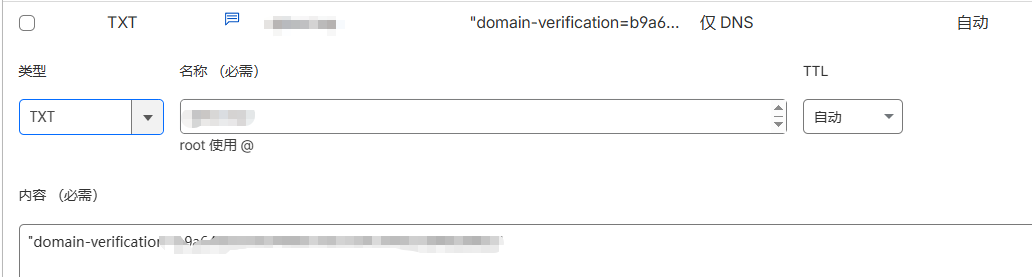
这里说还要给根域名加个TXT记录来证明这个域名是我的
就去cf上配置了一下
- 一个TXT记录,填入上面的值。
- 另一个A记录,指向这个ip。
然后从其他VPS上ping一下这个子域名,或者nslookup查一下,看看解析情况。

端口映射
端口有20个端口可以配置,我配置一个先试试。

# NAT服务器端,先安装apt install ncat,监听一下NAT机的8080端口
root@high-glove:~# nc -p 8080 -l
root@high-glove:~#

# 客户端,随便找台手边的linux,用nc测试一下映射的端口,看上去端口映射没问题
(base) djlion@djlion-PC:~$ nc -zv -w 3 ohno.xxxxx.xxx 50015
Connection to ohno.xxxxx.xxx (189.xxx.xxx.xxx) 50015 port [tcp/*] succeeded!
(base) djlion@djlion-PC:~$ nc -zv -w 3 ohno.xxxxx.xxx 50015
nc: connect to ohno.xxxxx.xxx (189.xxx.xxx.xxx) port 50015 (tcp) timed out: Operation now in progress
这里ip不一样,是因为家宽的动态ip重新分配了,先认为域名指向了对的ip
搭建节点
这机器存储不多,就不准备安装各种测试脚本或者一键部署脚本了,那些貌似都会安装一堆儿玩意儿,估计给我干爆了。

生成证书
证书也用cerbot生成的,用google搜索了这两篇,nat机用不了公网ip的80,443等端口,只有通过DNS-01 challenge方式了。
Configurig Let’s Encrypt with DNS-01 challenge on Debian 10 Buster
使用certbot-dns-cloudflare生成通配符证书与续期
apt install certbot python3-certbot-dns-cloudflare
没另外按照certbot去安装python虚拟环境,主要是为了节省存储,凑合着用吧,要啥自行车
mkdir -p ~/.secrets
vim ~/.secrets/cloudflare.int

dns_cloudflare_email = [email protected]
dns_cloudflare_api_key = xxxxxxxxxxxxxxxxxxxxxxxxxxxxx

chmod 0400 ~/.secrets/cloudflare.int

certbot certonly --dns-cloudflare --dns-cloudflare-credentials ~/.secrets/cloudflare.int -d ohno.xxxxxx.xxx
配置sing-box
按照Installation里 Repository Installation的方法,我拆开一步步执行(直觉告诉我,如果直接执行一整句,不出意外的话会出意外)
mkdir -p /etc/apt/keyrings
curl -fsSL https://sing-box.app/gpg.key -o /etc/apt/keyrings/sagernet.asc
chmod a+r /etc/apt/keyrings/sagernet.asc
echo '
Types: deb
URIs: https://deb.sagernet.org/
Suites: *
Components: *
Enabled: yes
Signed-By: /etc/apt/keyrings/sagernet.asc
' | sudo tee /etc/apt/sources.list.d/sagernet.sources &&
执行上面那句确实出了点意外
root@high-glove:~#    echo '
Types: deb
URIs: https://deb.sagernet.org/
Suites: *
Components: *
Enabled: yes
Signed-By: /etc/apt/keyrings/sagernet.asc
' | sudo tee /etc/apt/sources.list.d/sagernet.sources
sudo: unable to resolve host high-glove: Name or service not known

Types: deb
URIs: https://deb.sagernet.org/
Suites: *
Components: *
Enabled: yes
Signed-By: /etc/apt/keyrings/sagernet.asc
我猜与/etc/hosts有关系
root@high-glove:~# cat /etc/hosts
127.0.0.1       localhost
127.0.1.1       debian

# The following lines are desirable for IPv6 capable hosts
::1     localhost ip6-localhost ip6-loopback
ff02::1 ip6-allnodes
ff02::2 ip6-allrouters
然后把上面debian改给了
sed -i 's/127.0.1.1.*/127.0.1.1 high-glove/' /etc/hosts
# 再往上翻,执行上面echo那句

# 再去apt安装sing-box
apt-get update
apt-get install sing-box
修改配置/etc/sing-box/config.json
{
  "log": {
    "disabled": false,
    "level": "error",
    "timestamp": true
  },
  "inbounds": [
    {
      "type": "vmess",
      "tag": "vmess-tls-in",
      "listen": "0.0.0.0",
      "listen_port": 8080,
      "sniff": true,
      "sniff_override_destination": true,
      "transport": {
        "type": "ws",
        "path": "/AreUOK",
        "max_early_data": 2048,
        "early_data_header_name": "Sec-WebSocket-Protocol"
      },
      "users": [
        {
          "uuid": "xxxxxxxxxxxxxxxxxxxxxxxxxxxx",
          "alterId": 0
        }
      ],
      "tls": {
        "enabled": true,
        "server_name": "ohno.xxxxxx.xxx",
        "certificate_path": "/etc/letsencrypt/live/ohno.xxxxxx.xxx/fullchain.pem",
        "key_path": "/etc/letsencrypt/live/ohno.xxxxxx.xxx/privkey.pem"
      },
      "multiplex": {
        "enabled": true,
        "padding": false
      }
    }
  ],
  "outbounds": [
    {
      "type": "direct",
      "tag": "direct"
    }
  ],
  "route": {
    "rules": [
      {
        "inbound": ["vmess-tls-in"],
        "outbound": "direct"
      }
    ]
  }
}
目前只配置了VMESS协议,其他没怎么配置过,以后如果需要再加别的协议。
# 看一下状态
systemctl status sing-box
# 启动sing-box服务
systemctl start sing-box
# 设置开机启动
systemctl enable sing-box
# 再查查状态
systemctl status sing-box
客户端实测
客户端我用的shellCrash,在一个开发板上跑着,手动去修改的配置


浏览器中ZeroOmega配置的这个代理,然后访问了一下ping0.cc,情况如下:

配置DDNS
以为上面就结束了,其实并没有!第二天发现ssh连接不上了,问了佬友,家宽的ip更新了,这样一来我域名指向的ip就不对了,说需要配置ddns。我就google搜了几篇,cloudflare配置ddns的,实操一把。
- 使用Cloudflare实现DDNS
- 使用 Cloudflare DDNS(用的这个脚本)
# 创建个目录
mkdir -p /root/.workspace/bin/
# 粘贴上面的脚本
vim /root/.workspace/bin/cloudflare_ddns.sh
# 修改auth_token,zone_identifier,record_name,并退出

# 调试一下这个脚本有没有用
bash -x /root/.workspace/bin/cloudflare_ddns.sh

# 修改为没三个小时执行一次这个脚本
crontab -e
0 */3 * * * /bin/bash /root/.workspace/bin/cloudflare_ddns.sh
最开始不确定这脚本在ip变动的时候会不会改,第二天再看的时候,确实家宽ip更新了,域名指向了此ip。
其他说明
到此基本上就差不多了,遇到其它问题再见招拆招吧,目前对于我自己来说是完全够用的,稳的下个月考虑续费一下。
此篇只是记录一下自己的配置过程,因为几个月后如果再折腾,这些可能就忘记光了,好记性不如烂笔头。


